The post Smile Transformation: The Braces Are Off! appeared first on One Busy WAHM.
]]>Oh my goodness. This day, it finally happened…
I got my braces off!
It’s been just a little over one year since I declared I was no longer going to be unhappy over things I could change. And what a journey it has been. For years I have wanted to do this, and this past year has flown by so fast.
When starting out on any journey, to be told it will take a year (or more) can seem like a lifetime. It can be paralysing and stop you from taking that first step. Time passes anyway… you might as well spend it doing something worthwhile.
I’m kicking myself for not doing this sooner.
Transformation:
12 months, 60 lbs and a set of braces
My teeth feel all super shiny and new again. No more brackets!
I’ve got to wear a retainer for a while to ensure my teeth don’t move and I’m feeling pretty mixed about that. I’m overjoyed to have my braces off but these might be more annoying than the braces! They will definitely cut down on unnecessary snacking more than my braces ever did. On a plus note, they don’t hurt, no-one can tell I’m wearing them and I don’t have a lisp. They will be worth it to maintain the correction of my teeth.
There are lots of brace options available depending on your teeth and lifestyle choices, but you can read here why I chose Damon braces over other popular options such as Invisalign or regular braces. You can even see me getting my braces fitted.
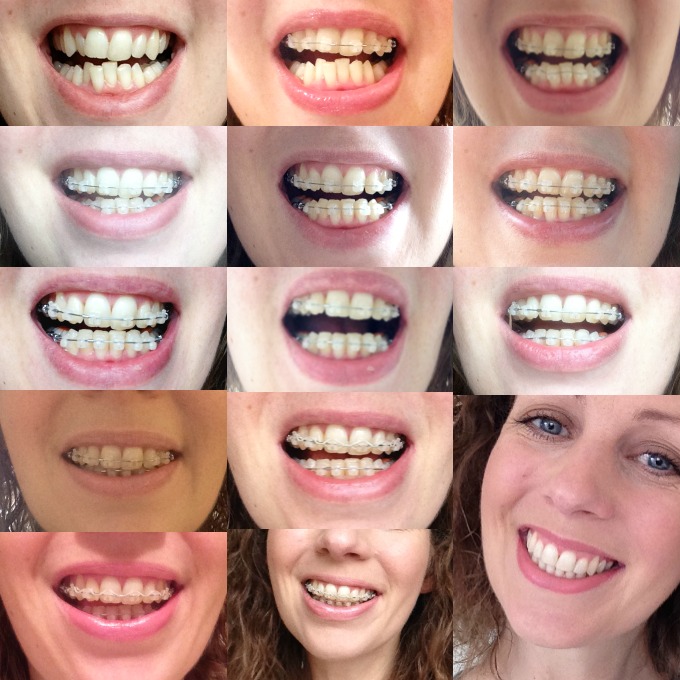
My Braces: Before, During & After
You’ve got to forgive the photos. I know, I know, they are *not* the prettiest.
Now you see why I wanted braces 
And the goofy smile is just to show you both sets of teeth… normally my bottom row (the worst!) is hidden by my lips.
I could have Photoshopped them and made them nicer, but that’s not me. If you’ve followed along with my weight loss journey too, you will know that I share real pics from a real mum.
Since getting my braces removed, I’ve been asked lots of questions from friends and readers. There’s already lots here on the blog and via my social media, but so I can answer everyone, I’m going to respond to these in a further series of blog posts and try to cover all your questions!
These will include:
- How to choose an Orthodontist that is right for you
- How much do braces cost and how you can afford them
- Foods you can (and cannot!) eat with braces
- How to care for your braces and retainers
Have any other questions? Let me know in the comments below and I will answer them for you!
In the meantime, if you’ve ever wanted to get braces fitted, go visit your Orthodontist and discuss options that are right for you.
If you are in the Dorset or Hampshire region, I totally recommend my Orthodontist: Dr. Hardip Dhatt (and his awesome sidekick nurse, Hannah). Go along for a free consultation and see how you can transform your smile, too.
But before I finish… a few more gratuitous smiley photos. Sorry, I can’t help it!
Say, Cheese!”


The post Smile Transformation: The Braces Are Off! appeared first on One Busy WAHM.
]]>The post (New) Weight Loss Target: Achieved! Over 4 Stone Weight Loss + Pics appeared first on One Busy WAHM.
]]>Yesterday – Saturday 27th December, 2014 – I achieved (and exceeded!) my new weight loss goal.
A total weight loss of 4 stone, 1.5 lbs (57.5 lbs)
And in Christmas week, too!

You may recall back at Halloween, I achieved my 3.5 stone (50 lbs) weight loss goal, and I was happy. Very happy.
But when I got there, I didn’t feel ‘right’. I mean, it felt good – but I wanted to go further.
Having got this far, I knew I could achieve more.
Plus, I felt twitchy at the 3.5 stone and wanted to round this up to 4 
I didn’t make my new goal public, as I already started having people telling me not to lose any more weight. And you know what, if there is one thing that will make this stubborn girl do something… it’s telling her not, too. This is my body, and for the first time in forever, I am starting to like and love what I see. I won’t allow anyone tell me how I can or cannot feel, even if done with the best intentions. So thank you to those people for spurring me on 
I started my Slimming World journey on Friday 3rd January, 2014 and was determined to reach my goal this same year. And I did!
One Girl: One Dream, One Goal

WEIGHT LOSS UPDATE
Starting weight: 13st 8lbs
Current weight: 9st 6.5 lbs
Total weight loss: 4 stone and 1.5 lbs (57.5 lbs)
Height: 5′ 7″
Starting clothes size: 18 (USA 14)
Current clothes size: 8 (USA 4) << US sizing is SO much nicer!
Right now, I feel EXCITED!
When I started this journey, I *thought* I wanted to rediscover the ‘old’ me.
I’ve gone beyond that.
I truly feel like a ‘new’ me. A happier me.
And whoever says weight loss doesn’t bring happiness, sure never felt the way that I’m feeling right now.
Are you thinking about starting your own weight loss journey? Imagine yourself 6 months from now!
Don’t stop, it will be worth it!
Never give up on a dream because it takes time to accomplish. Time passes quickly. Get busy. Get started. Dream BIG!
xoxo Natalie
The post (New) Weight Loss Target: Achieved! Over 4 Stone Weight Loss + Pics appeared first on One Busy WAHM.
]]>The post How To Make An Elsa Dress (no sewing required!) appeared first on One Busy WAHM.
]]>
It seems every little girl’s dream right now is to own a dress just like Queen Elsa. But with official Frozen merchandise so sparse (and expensive!) I just knew I’d have to get creative and make an Elsa dress of our own.
Actually, it’s not that difficult to make an Elsa dress – and it’s really quite quick and fun!
Even your little one could drive you nuts help you.
To make an Elsa dress you will need:
1 x stretchy crochet top
1 x roll of turquoise tulle
Tape measure
Scissors
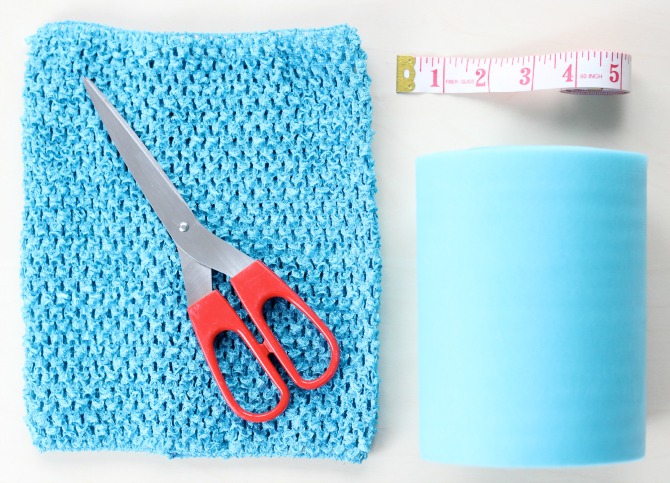
First, you need to decide how long you want your dress skirt to be. Using the tape measure, measure from your child’s waist downwards.
Remember this measurement and DOUBLE it. This will be the length you need to cut your pieces of tulle.
How To Make An Elsa Dress
Take your spool of tulle and cut-off a number of pieces that are equal in length to your (doubled) measurement.
It’s easier to prepare them in advance so start with 20-30 lengths and work from there.
You may also find it easier to stretch your crochet band over a book to expose the holes and make it easier to thread your skirt.
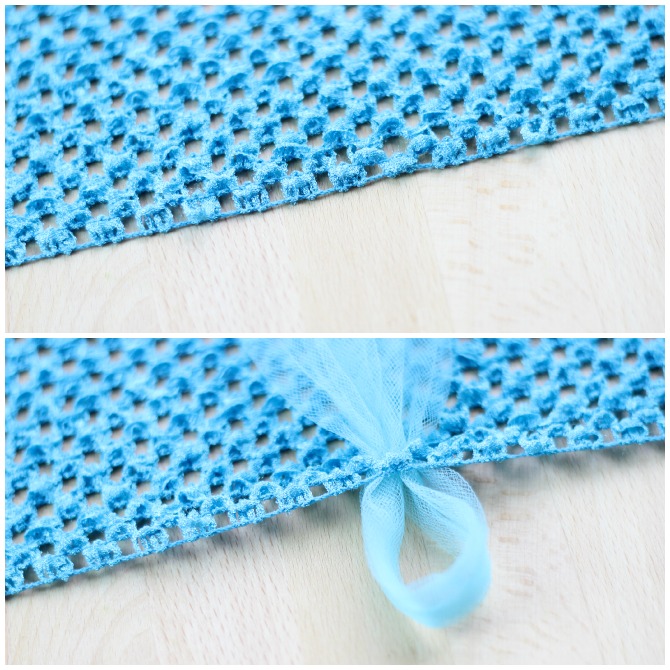
Take one piece of your cut tulle length, fold it in half and poke it through a hole on the lower edge of your crochet band.
I like to start threading on the 2nd row, as the first edge always looks so delicate!
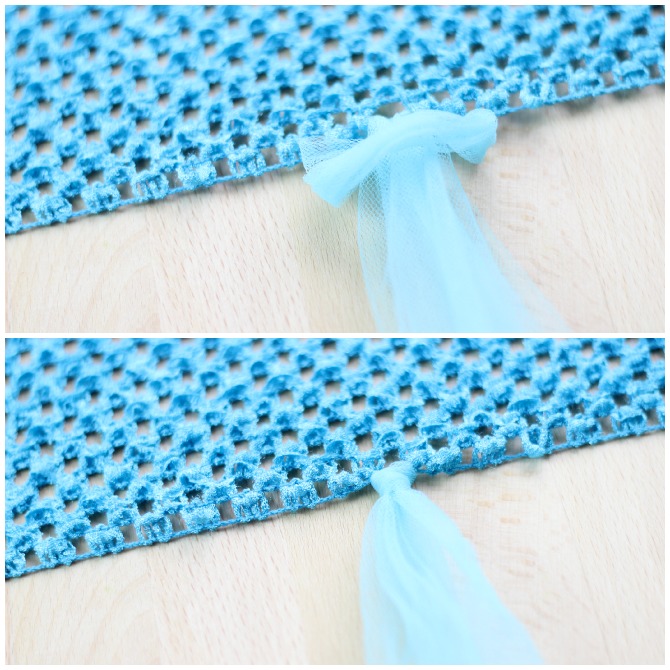
Holding the two loose ends of your folded length of tulle, poke them through the loop and gently pull to fasten.
Now the fun part… repeat all the way round 
Since Elsa’s dress is very fitting and elegant, I didn’t want the skirt of my Elsa dress to be overly ‘full’. I therefore chose to thread my tulle through every other hole in my crochet band.
And remember, this band is stretched open whilst I’m threading, so these will all condense down, too.

Once you’ve finished your first row, begin threading a second row for your Elsa dress.
This time, thread your tulle through alternate holes in the row above so you have no gaps in your skirt.

Decorate your Elsa Dress
I was hoping to find some gorgeous snow flakes that I could decorate our Elsa dress with, unfortunately, there was nothing to be found.
Instead, I found this gorgeous turquoise sequinned flower, which looks kinda like a snowflake, dontcha think?
In keeping with my no-sew project, I simply cut off a half-inch strip from my tulle roll and tied this on. Why make things more complicated than they need be!

The straps of our Elsa dress were super simple, too.
I took one of our left-over lengths of tulle from our skirt and made another slip knot at the front of the dress (at the top edge of the crochet band).
Taking one of the ends, I pulled it over the shoulder, pulling the fabric straight to form a small sleeve, then simply tied in a knot at the back to fasten.
You can trim any loose ends or just hide them inside.
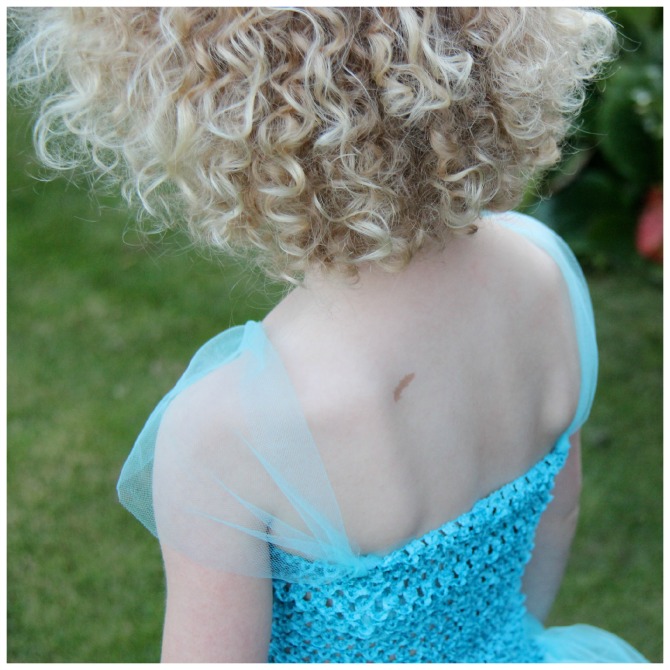
And that’s it.
How to make an Elsa dress!

You like?
Do you wanna build a snowman?
Sorry, I couldn’t resist
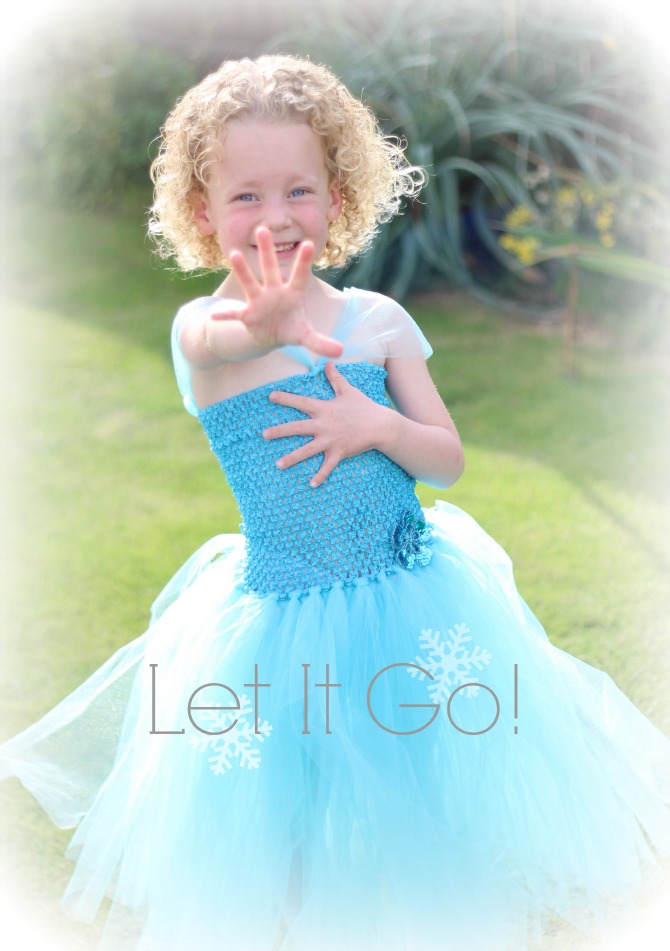
Your turn!
Why don’t you have a go and make an Elsa dress for your little Princess. It would make a perfect costume for Halloween!
If you do make one, I’d love to see it. Please pop back and share a photo or leave a post on my Facebook wall.
Got any questions? Leave me a message in the comments section below and I promise to respond to you.
xoxo Natalie
The post How To Make An Elsa Dress (no sewing required!) appeared first on One Busy WAHM.
]]>The post 3 Ingredient Breakfast Pancakes appeared first on One Busy WAHM.
]]>
Pancakes are quite possibly my most favourite breakfast of all. Sweet pancakes, savoury pancakes – I love them all!
Maybe it’s the indulgence of a lazy weekend morning… whipping up a batch of pancakes whilst singing along to the sound dock as the kids play in the other room. Maybe it’s the warmth on a chilly morning that kick-starts the day. Or maybe, it’s because I can eat an entire STACK of these little beauties knowing that I am starting my day 100% on track with my weight loss plan.
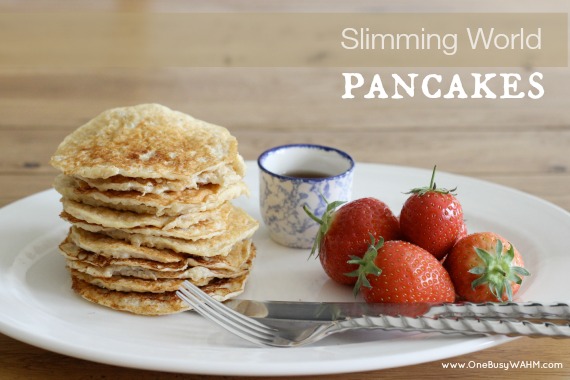

- 35g of porridge oats
- 1 fat-free Muller Light yoghurt
- 3 eggs
- In a bowl, lightly whisk your 3 eggs until the white and yolk are all blended together
- Add your oats and stir to evenly combine
- Pour in the yoghurt and stir
- Lightly spritz a non-stick frying pan with an even coating of Fry Light
- Drop one tablespoon of pancake mix into your hot pan
- Use the back of your spoon to smooth out into an even layer and shape
- Leave for 2 - 3 minutes
- Using a spatula, gently tease the edges of your pancake to loosen from the pan before flipping over
- Cook for a further minute until golden
I love my pancakes served simply with fresh fruit and 100% pure maple syrup (3 syns for 6 teaspoons on Slimming World).
Tip: serve your maple syrup in an egg cup, that way it won’t soak through all your pancakes and will go a lot further 
These are also great served with lean bacon and a softly-cooked poached egg on top!
You can use any flavour Muller Light yoghurt you wish, but I prefer the toffee variety. Not only does it look pancake-coloured and you are not left with some crazy pink creation, but it also have a very subtle taste that means you can add almost any topping you wish.
Oh, and don’t be tempted to poke and prod your pancakes whilst they are in the pan. You will end up with a scrambled mess!
What is your favourite pancake topping?
~ Natalie
The post 3 Ingredient Breakfast Pancakes appeared first on One Busy WAHM.
]]>The post 52-Week Money Saving Challenge {Free Printable} appeared first on One Busy WAHM.
]]>| 52-Week Money Saving Challenge
How would you like to finish this new year £1,378 better off than when you started?
Join our fun 52-Week Savings Challenge and by putting away just a little amount into a savings pot each week, you will have £1,378 at the end of the year!
52-Week Money Saving Challenge
How it works?
Print off the free savings challenge printable below, and stick it somewhere you will see it often. (I’m keeping mine on the fridge door.)
Set aside the featured amount each week. Eg. Week 1 = £1, Week 2 = £2.
The amount increases by just £1 each week right up until Week 52 when you will have amassed a whopping £1,378!!!
52 weeks to save £1,378… You can do it!
Who do you know that would love to join the 52-Week Savings Challenge with you? Please feel welcome to share this page with family and friends on Facebook or your favourite social media network. You’ll find some easy links to share below!
~ Natalie
The post 52-Week Money Saving Challenge {Free Printable} appeared first on One Busy WAHM.
]]>

